SageMaker : 나만의 이미지 생성모델 만들기 (with Fine-Tuning)

Written by Hyeonmin Kim
Generative AI 모델은 크게 두 가지 부류로 나뉩니다. 바로 이미지 생성 모델과 텍스트 생성 모델입니다.
각각의 생성 모델은 입력이 어떻게 들어오던, 출력은 이미지와 텍스트 두 가지로 출력되게 됩니다.
요즘에는 이를 활용하여 챗봇을 생성하거나, 이미지 자산을 만들어 사용하는 경우가 많은데요

오늘은 위 아키텍쳐를 토대로,
이미지 생성 모델을 SageMaker 를 사용하여 쉽게 배포해 보고
나만의 이미지를 SageMaker Training Job 을 통해 학습시킨 뒤
파인 튜닝된 이미지 생성 모델을 사용하여 나만의 이미지를 기반으로 한 이미지를 생성
해보도록 하겠습니다.
SageMaker 는 2020년 12월 JumpStart 기능을 선보였습니다. 이후 제공되는 모델컬렉션이 꾸준히 증가하면서 2022년 11월에 Stable Diffusion 모델을 쉽게 배포할 수 있게 되었습니다. 우리는 이 JumpStart 기능을 사용하여, Stable Diffusion이라는 text-to-image 모델을 활용, 나만의 이미지를 학습시키고 학습하는 과정을 진행하려고 합니다.
환경 준비하기
본 포스트 내용을 사용하기 위해서는 SageMaker Studio 환경이 필요합니다. (참고: 스마일샤크 블로그 AWS로 쉽게 시작하는 GenAI Fine-tuning)
먼저 SageMaker Studio 에 접속하여, 주피터 노트북(.ipynb) 환경을 생성한 뒤 진행하도록 하겠습니다.


다음과 같은 주피터 환경이 표시된다면 Ok입니다.

SageMaker 환경 구성하기

먼저, 해당 작업을 하기에 앞서 관련 AWS 리소스에 접근할 수 있는 권한을 부여하기 위해 세션을 점검해 보도록 하겠습니다.
import botocore
import sagemaker, boto3, json
from sagemaker import get_execution_role
import os

iam = boto3.client("iam")
aws_role = iam.get_role(RoleName="hmkim-sagemaker-full")["Role"]["Arn"]

boto_session = boto3.Session()
aws_region = boto_session.region_name
sess = sagemaker.Session(boto_session=boto_session)

print(aws_role)
print(aws_region)
print(sess.boto_region_name)
다음과같이, IAM 롤과 함께 2가지의 region 명이 일치한다면 성공입니다.
이제 이미지를 학습하기 위한 디렉토리를 생성하고, 학습될 이미지를 넣어보도록 하겠습니다.
다음 코드를 실행하면, training_images 라는 폴더가 생성되는데, 여기에 학습시킬 이미지를 추가하여야 합니다. 이번 포스트에서는 저희 집 강아지를 학습시켜 보도록 하겠습니다.
local_training_dataset_folder = "training_images"
if not os.path.exists(local_training_dataset_folder):
    os.mkdir(local_training_dataset_folder)
학습 이미지 셋 추가하기

왼쪽의 메뉴바를 확인하여 training_images 폴더가 생성된 것을 확인한 뒤 이미지를 추가합니다.

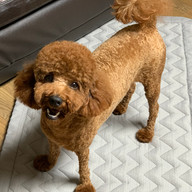
다음의 샘플 이미지를 활용해도 좋지만, 저희 집 강아지를 넣어보도록 하겠습니다.


참고로 강아지 이름은 에코이며 견종은 푸들입니다. 학습에 사용된 이미지는 다음과 같습니다.


드래그 앤 드롭으로 간단하게 이미지를 추가할 수 있습니다.

학습될 이미지 셋을 추가해 주었으니 이 이미지가 무엇을 뜻하는지에 대해 알려주어야 합니다.
우리는 “무엇을 뜻하는지”에 대한 내용을 dataset_info.json 파일에 추가해 주도록 하겠습니다.
다음 코드를 사용하여 작성합니다. 저는 에코라는 이름을 가진 강아지의 사진이라는 프롬프트를 작성하였습니다.
instance_prompt = "A photo of a dog named echo"

import os
import json

with open(os.path.join(local_training_dataset_folder, "dataset_info.json"), "w") as f:
    f.write(json.dumps({"instance_prompt": instance_prompt}))
dataset_info.json 파일이 생성되며, 내용은 다음과 같습니다.

학습용 / 출력용 S3 지정하기

이제, SageMaker 모델과 학습용 데이터가 저장될 S3 버킷을 지정하도록 하겠습니다. AWS에서 제공하는 utils.py를 사용하여 없다면 자동으로 생성할 수 있습니다.
mySession = boto3.session.Session()
AwsRegion = mySession.region_name
account_id = boto3.client("sts").get_caller_identity().get("Account")

training_bucket = f"stable-diffusion-jumpstart-{AwsRegion}-{account_id}"

s3 = boto3.client("s3")
s3.download_file(
    f"jumpstart-cache-prod-{AwsRegion}",
    "ai_services_assets/custom_labels/cl_jumpstart_ic_notebook_utils.py",
    "utils.py",
)


from utils import create_bucket_if_not_exists

create_bucket_if_not_exists(training_bucket)
학습을 진행할 S3 경로를 지정합니다. 그 후 이전에 training_images로 저장해두었던 학습 이미지 셋을 S3에 복사(업로드)하도록 하겠습니다.
train_s3_path = f"s3://{training_bucket}/custom_dog_stable_diffusion_dataset/"

!aws s3 cp --recursive $local_training_dataset_folder $train_s3_path
실제 버킷을 확인해 보면, 이미지들이 업로드된 것을 확인할 수 있습니다.

결과물이 출력될 S3를 지정하도록 하겠습니다.
output_bucket = sess.default_bucket()
output_prefix = "jumpstart-example-sd-training"

s3_output_location = f"s3://{output_bucket}/{output_prefix}/output"
SageMaker Training 세팅하기

이제 이 이미지를 가지고 stable diffusion 모델을 파인튜닝 해보도록 하겠습니다.
이전에 jumpstart 모델로 stable diffusion이 추가되었음을 소개해 드렸는데요, 때문에 학습을 진행할 base 모델을 쉽게 지정할 수 있습니다. 우리는 model-txt2img-stabilityai-stable-diffusion-v2-1-base 모델을 사용하여 진행해보도록 하겠습니다.
from sagemaker import image_uris, model_uris, script_uris

train_model_id, train_model_version, train_scope = (
    "model-txt2img-stabilityai-stable-diffusion-v2-1-base",
    "*",
    "training",
)

training_instance_type = "ml.g4dn.2xlarge"

train_image_uri = image_uris.retrieve(
    region=None,
    framework=None,
    model_id=train_model_id,
    model_version=train_model_version,
    image_scope=train_scope,
    instance_type=training_instance_type,
)

train_source_uri = script_uris.retrieve(
    model_id=train_model_id, model_version=train_model_version, script_scope=train_scope
)
train_model_uri = model_uris.retrieve(
    model_id=train_model_id, model_version=train_model_version, model_scope=train_scope
)
SageMaker SDK를 사용하여 학습에 필요한 환경과 소스, 모델을 자동으로 가져옵니다. 이 또한 SageMaker가 가지는 큰 장점 중 하나라고 생각합니다.

튜닝을 하기 위해 하이퍼 파라미터를 정의합니다. 이 또한 SageMaker SDK에서 모델에 맞는 디폴트 하이퍼 파라미터를 제공해 주기 때문에, 수정하고 싶은 부분만 수정하면 됩니다. 저는 max_step만 조정해 보도록 하겠습니다.
from sagemaker import hyperparameters

hyperparameters = hyperparameters.retrieve_default(
model_id=train_model_id, model_version=train_model_version
)

hyperparameters["max_steps"] = "200"
print(hyperparameters)
SageMaker Training Job으로 파인튜닝 진행하기

SageMaker SDK(Training)로 파인튜닝을 진행해 보도록 하겠습니다.
다음 코드를 실행하면 이미지 셋과 모델에 제공되도록 정의했던 리소스들을 포함하여 estimator를 생성하고, s3를 참조하여 피팅을 진행하게 됩니다. 해당 작업은 10분 정도 소요됩니다.
%time
from sagemaker.estimator import Estimator
from sagemaker.utils import name_from_base
from sagemaker.tuner import HyperparameterTuner

training_job_name = name_from_base(f"jumpstart-example-{train_model_id}-transfer-learning")

sd_estimator = Estimator(
    role=aws_role,
    image_uri=train_image_uri,
    source_dir=train_source_uri,
    model_uri=train_model_uri,
    entry_point="transfer_learning.py",
    instance_count=1,
    instance_type=training_instance_type,
    max_run=360000,
    hyperparameters=hyperparameters,
    output_path=s3_output_location,
    base_job_name=training_job_name,
)

sd_estimator.fit({"training": train_s3_path}, logs=True)
SageMaker 콘솔에서 훈련을 확인해 보면, training job이 실행되고 있음을 확인할 수 있습니다.

training job이 실행되면, 자동으로 ml환경을 컨테이너로 구성하고, 학습을 거쳐 최종적으로 커스텀하게 학습된 모델이 출력됩니다.

학습된 모델은 이전에 지정한 output 버킷에 위치함을 알 수 있습니다.

파인튜닝 된 모델 배포하기

이제 이 파인 튜닝된 모델을 SageMaker Endpoint로 배포해 보도록 하겠습니다.
기존의 SageMaker 배포 방식과 동일하게 배포하나, 모델 정보를 trained model 정보로 지정합니다.
%time

inference_instance_type = "ml.g4dn.2xlarge"

deploy_image_uri = image_uris.retrieve(
    region=None,
    framework=None,
    image_scope="inference",
    model_id=train_model_id,
    model_version=train_model_version,
    instance_type=inference_instance_type,
)
deploy_source_uri = script_uris.retrieve(
    model_id=train_model_id, model_version=train_model_version, script_scope="inference"
)

endpoint_name = name_from_base(f"jumpstart-example-FT-{train_model_id}-")

finetuned_predictor = sd_estimator.deploy(
    initial_instance_count=1,
    instance_type=inference_instance_type,
    entry_point="inference.py",
    image_uri=deploy_image_uri,
    source_dir=deploy_source_uri,
    endpoint_name=endpoint_name,
)
파인튜닝된 모델 테스트하기
테스트를 해보기 위해 추론과정을 진행할 함수들을 선언해보겠습니다.
import matplotlib.pyplot as plt
import numpy as np


def query(model_predictor, text):
    """Query the model predictor."""

    encoded_text = json.dumps(text).encode("utf-8")

    query_response = model_predictor.predict(
        encoded_text,
        {
            "ContentType": "application/x-text",
            "Accept": "application/json",
        },
    )
    return query_response


def parse_response(query_response):
    """Parse response and return generated image and the prompt"""

    response_dict = json.loads(query_response)
    return response_dict["generated_image"], response_dict["prompt"]


def display_img_and_prompt(img, prmpt):
    """Display hallucinated image."""
    plt.figure(figsize=(12, 12))
    plt.imshow(np.array(img))
    plt.axis("off")
    plt.title(prmpt)
    plt.show()
이제 프롬프트를 작성, 이미지를 출력해보겠습니다. 프롬프트는 웃고있는 에코의 이미지를 출력해달라고 해봤습니다. (A photo of a dog named echo with happy smile)
all_prompts = [
    "A photo of a dog named echo with happy smile",
]
for prompt in all_prompts:
    query_response = query(finetuned_predictor, prompt)
    img, _ = parse_response(query_response)
    display_img_and_prompt(img, prompt)
AI 에코가 완성되었네요..그런데 뭔가 이상합니다. 옷이 앞 다리에만 입혀져 있네요. 한번 더 생성해 보겠습니다.
all_prompts = [
    "A photo of a dog named echo that eating snacks",
]
for prompt in all_prompts:
    query_response = query(finetuned_predictor, prompt)
    img, _ = parse_response(query_response)
    display_img_and_prompt(img, prompt)
정상적으로 생성되지만, negative word를 넣어 입고 있는 옷이나 기타 필요 없는 내용들을 지워야 사용할 수 있을 것 같습니다. 아마도 이미지 학습 시에 옷을 입고 있는 에코 이미지를 사용했기 때문에 옷이 출력되는 것 같네요.
프롬프트를 조금 더 세밀하게 조정하기 위해서 쿼리함수를 정의하고 사용해 보도록 하겠습니다.
from PIL import Image
from io import BytesIO
import base64
import json

def query_endpoint_with_json_payload(model_predictor, payload, content_type, accept):
    """Query the model predictor with json payload."""

    encoded_payload = json.dumps(payload).encode("utf-8")

    query_response = model_predictor.predict(
        encoded_payload,
        {
            "ContentType": content_type,
            "Accept": accept,
        },
    )
    return query_response


def parse_response_multiple_images(query_response):
    """Parse response and return generated image and the prompt"""

    response_dict = json.loads(query_response)
    return response_dict["generated_images"], response_dict["prompt"]

def display_encoded_images(generated_images, title):
    """Decode the images and convert to RGB format and display

    Args:
    generated_images: are a list of jpeg images as bytes with b64 encoding.
    """

    for generated_image in generated_images:
        generated_image_decoded = BytesIO(base64.b64decode(generated_image.encode()))
        generated_image_rgb = Image.open(generated_image_decoded).convert("RGB")
        display_img_and_prompt(generated_image_rgb, title)


def compressed_output_query_and_display(payload, title):
    query_response = query_endpoint_with_json_payload(
        finetuned_predictor, payload, "application/json", "application/json;jpeg"
    )
    generated_images, prompt = parse_response_multiple_images(query_response)

    display_encoded_images(generated_images, title)
이제, 이미지를 생성하는데 옷(cloth)을 부정 프롬프트로 지정하고 생성해 보도록 하겠습니다.
prompt = "A photo of a dog named echo with happy smile."
negative_prompt = "cloth"
payload = {"prompt": prompt, "negative_prompt": negative_prompt, "seed": 1}
compressed_output_query_and_display(
    payload, f"generated image with negative prompt: `{negative_prompt}`"
)
이제야 뭔가 조금 저희집 에코같네요..ㅋㅋ 이번에는 바닷가에서 뛰어노는 에코를 출력해달라 요청해 봤습니다.
prompt = "A photo of a dog named echo / the dog is running on the beach side"
negative_prompt = "cloth"
payload = {"prompt": prompt, "negative_prompt": negative_prompt}
compressed_output_query_and_display(
    payload, f"generated image with negative prompt: `{negative_prompt}`"
)
역시나 잘 생성됩니다.
두 가지의 출력물을 보았을 때, 각각의 출력물이 이전에 학습시킨 이미지와 유사한 것을 확인할 수 있습니다.


아마도 학습시키는 이미지가 많아지면 많아질수록 더욱 정확한 이미지가 나올 것 같네요
오늘은 SageMaker를 사용하여 Jumpstart FM 모델 중 하나인 Stable Diffusion 모델을 커스텀 이미지와 SageMaker Training Job을 사용하여 파인튜닝을 진행, 나만의 이미지를 생성할 수 있는 모델을 생성하고 배포해 보았습니다. 자사의 이미지 에셋 생성부터, 가상의 인물생성 등 활용할 수 있는 범위가 무긍무진할 것 같습니다. 이것으로 포스트를 마칩니다.